Preparing Canvas Boards
Hi there,.. now if you happened to read one of my latest posts on one of my other blogs Jackie Gomez Fine Artist then you'd have heard about my next series of Fantasy Paintings that will be done on small (approx.) 7 x 5in canvas boards,... I thought I would show and describe as best I could how I usually prepare them,..
The reason why I often times use hardboard to paint on is because it's a more stable surface than canvas alone ( oil paint dries hard and is more likely to crack on a flexible surface, .. one would not have this problem with other more malleable media like acrylic) This of course contributes to the archival quality of the oil painting,..
Now stretching canvas over the top is a matter of textural preference, the effects desired and requirements needed for the painting at hand would probably be a few of the things one would base their decision on...
Materials:
1.Hardboard
I usually use an eighth of an inch thick hardboard.
There are 2 types:
- tempered (sand well before hand as it has an especially hard and nonabsorbent surface)
- untempered ( just sand lightly to break surface fiber. It is less dense, and susceptible to moisture penetration)
2. Canvas
I used smooth Cotton duck (moderately thick). I would suggest using linen if you can find it (I can't over here :( ) as it's fibers are considerably longer and more durable,.. though this is of less importance when making canvas boards.
Thin cotton such as muslin or bed sheets can also be used (because of the hardbourd backing) for those thinking economically.
3. PVA Glue (I use the heavy duty type bought in hardware stores, which is really thick and can be diluted to desired consistency)
Optional tools:
- G Clamp
- Saw (to cut Hardboard to size)
- Sandpaper
- A beveling rough sanding tool ( really can't find the name, if anyone out there does know , I would really appreciate your input )
- Squeegee
- Large shallow bucket (or anything you have to soak the canvas in)
The Process
1. After sawing the hardboard to the desired size, sand the surface and smoothen edges to prepare it for the next stage,..

Hold your beveler at a constant angle as you sand back and forth down the sides of the hardboard.
note: beveling the edges ensures more archival quality as the bevel puts less stress on the canvas over time, than if they were sharp edges...
2. I proceed to bevel the top edges ( about 5mm in ( i suggest drawing a guide line) at an approx 45 degree angle, using the G clamp to hold the board in position.. ( disregard the white prime layer in the picture, as I used one of my old prepared primed hardboards ( for works I wish to do without the canvas) and decided to make it in to canvas boards instead for this project...
3. Cut Canvas to size ( allowing at least a 2in overlap in the back, also take in to account shrinkage after washing). Wash the canvas to remove any sizing that store bought canvas usually has, then while still damp, iron smooth.
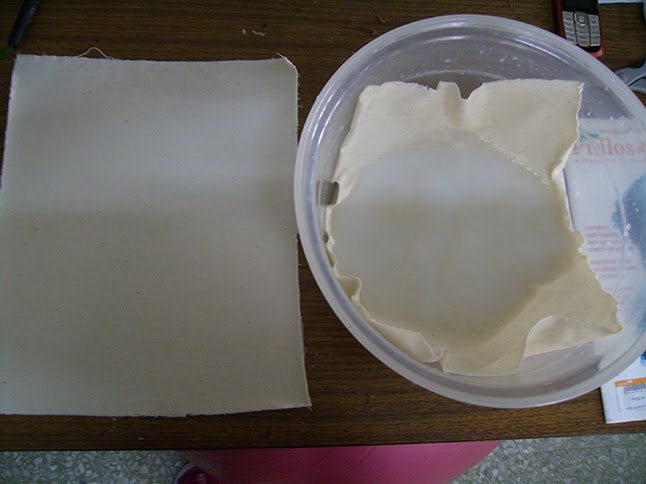
4. Dilute some PVA Glue just enough so that the canvas can absorb it evenly when soaked. Lay the canvas as smoothly as possible in the container ( so as to avoid any wrinkles ( this is where a bigger, flatter container than the one in the above picture (it's all I had),would be useful ). Let sit for about a 1/2 hour or until glue has fully soaked thru.
This method makes the bond between the canvas and hardboard extremely strong so if you foresee ever wanting to remove the canvas from this hardboard backing in the future it would be best to skip step 4. Instead proceed with step 5 then spray and even mist of water on the underside of the dry ironed canvas before laying it over the prepared hardboard in step 6.
5. I then use the thickest concentration of PVA Glue, smoothed out in an even layer all over the hardboard surface.

Using the squeegee, I smooth the thick glue evenly in a not too thick layer (not forgetting the beveled edges)
6. Now before the glue starts to dry, take a fully soaked wet canvas sheet and lay it on top (ensuring it's positioned centrally and at right angles over the canvas board.. don't press down yet..
7. When satisfied with the position of your canvas, start (with a light motion) to smooth, from the centre outwards. Then using the squeegee smooth from the centre outwards again with harder pressure, making sure the whole surface is adhering smoothly and evenly throughout...

Using the squeegee to apply even pressure through out ( working from the centre outwards in all directions)

Completely stuck canvas on top side (front)
8. Now working fast so that your working with a still wet canvas, turn over the board and proceed to rub in some more undiluted PVA Glue evenly over the back ( I used my fingers here as the back of my hardboard was textured)

Be sure to place the canvas top (front) on a clean non absorbent surface when you turn it upside down.
9. Now working with opposing corners (diagonal), fold over the canvas moderately tightly and smooth down (making sure it is adhering well to the board)

Fold one corner then the opposing corner till all corners are stuck down well.

Folding neatly, work from top then bottom, left then right.
10. Continue to fold the horizontal and vertical edges, stretching the canvas moderately as you work to ensure that every part is pressed down as firmly and snugly as possible. (rub from the under edge upwards so that the canvas on the top surface (front) and bevel edges is adhering as snugly and tightly as possible too)

Set Canvas boards on edge to dry. (That little cutie at the end is Crookshanks , named after the cat in Harry Potter..:) )
11. Set canvas boards to dry with enough ventilation, front and back. ( the canvas boards should feel only slightly damp at this point)
12. After completely dry ( I left to dry for about 2-3 days, for I live in a Mediterranean moist climate) you can proceed to prime as usual. PVA glue is also used as a modern day size so you only need to prime with gesso or even work on it bare depending on the media your using and such....
Alright thats all for now,.. I hope you found this post informative and interesting. The materials and process used have a lot to do with what is available here in my neck of the woods,.. but also hopefully will stand the test of time...
Thanks a bunch for visiting, if you have any questions or feedback ( like "I don't think this is the way you should be doing stuff"... I'm always ready and willing to learn something new) please do leave me a comment....


Comments
Post a Comment