Making a Custom Fit Braced Picture Frame.
When it came to framing an old Mixed Media Painting that I'd done some 8 years back, I knew not any old frame job would do.
The backboard had slightly warped (as inevitably happens to larger works on hardboard without a brace) so I knew it was high time I rectified it. The next challenge was to make a safe strong support to enable me to display this art piece as it was meant to be displayed... up on the wall. I couldn't have the bottom falling off it under the weight of the painting, and the only way I could think of to minimize the weight on the bottom frame bar was to distribute the weight to the side frame bars..
 |
| Crime Scene : Unframed Artwork (and what looks like a really dead body) |
The Case Study
Support: Hardboard ( slightly warped )
Media: Approx. 2 inch thick Plaster of Paris carving, stones, sand and paint.. (makes these paintings very very heavy and need extra care from knocks)
Target Display: To be safely hung on the wall
Diagnosis
Support: Needs straight backing as a brace
Media: thick and heavy media have to be supported as much as possible when upright on the wall.
Target Display: needs a very very supportive frame, strong enough to hold weight up on wall
Prescription
Support: Carve straight grooves all around wood frame for edges of painting to slot in to, so hardboard doesn't warp.
Media: Carve exact modulations of the mixed medias thick textured edge as grooves in the sides of the frame for the the edges of the painting to snugly slot in to. This snug fit will give extra overall support to the painting.
Target Display: Frame joints will have to be made extra strong with adapted dovetail joints. Knowing most of the weight will be on the bottom frame bar the carved edges of the side bars where the painting slots in to will be designed to transfer some of this weight to the side bars as well. The joints will also be slightly dovetailed for extra strength.
Materials Needed
note* I am a novice carpenter, so these are pretty simple tools and materials
1. Raw Wood : 0.75 inches thick and 1.5 inches wide
2. Plywood : about 1/8in thick
3. Screws : 8 per Artpiece = 24 altogether (look I can calculate!)
4. Thickened Linseed Oil
5. Liquin (optional)
6. Copper
7. Burnt Umber & Ultramarine Alkyd Paint
8. Turpentine
The Tools
1. Hand Saw
2. Mitre Box (made one myself in less that 10mins with scrap wood for free!)
 |
| Hand Saw, Chisel & Wood Rasp |
3. Chisel (I used one about 1/2 an inch wide)
4. Sharp carving tool (I used a sharp and strong pen knife)
5. Hammer (used with the chisel)
 |
| Mitre Box (sawing a 45 Degree Angle for joints). Wood & mitre box held in place with G Clamps. Later I sawed another 45 degree angle in the opposite direction to cut wood facing the other direction. |
6. 2 G Clamps
7. Wood Rasp
8. Power Drill
9. Staple Gun
10. Sandpaper & Sandpaper Block
There will be 6 parts altogether in making this frame.
Part 1 : Preparing the Wood.
1. Saw the Frame bars the appropriate length.
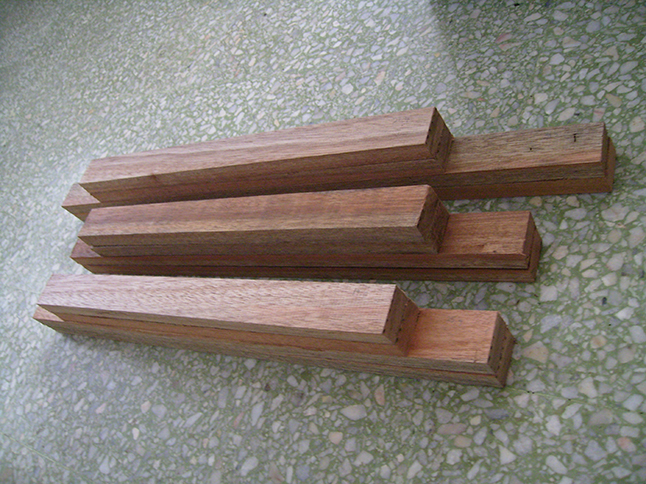 |
| Raw wood sawn to the exact lengths needed for all 3 artpieces. |
Try to find good wood with a nice look to the grain and is not warped. It should be durable but still soft enough to work with (especially if your doing it mostly by hand like me).
Troubleshooting for wood that is a bit warped
1. Lay a wet towel on top and underneath the warped wood preferably on a flat table where you can use the G Clamps.
2. With the help of G clamps and very heavy objects, force the wood completely flat and leave be for a day or at least a few hours. Warping as I understand it, is usually caused by one side or part being exposed to the sun or heat, thus drying out more on one side than the other and warping. The wet towels restore this moisture, and with enough pressure the wood can be forced flat again.To measure the length of the frame bars (for all sides)...
 |
| For example (Length of Artpiece) 20in + Frame bar thickness (0.75in x 2 = 1.5in) - Depth of Indentation of grooves ( about 0.37in on each side so 0.37in x 2 = 0.75in) = 20.75in |
 |
| As you can see the artwork fits about halfway in the sides of the frame bars |
 |
| The narrower side of the wood (0.75 in) faces forward while the wider side (1.5 in) will have deep grooves carved in for the artwork to fit in to. |
 |
| The Vertical Bars fit in to the Horizontal Bars Here you can also see clearly, the artwork fitting in grooves about a depth of 0.37 inches |
Part 2 : Making the Joints
1. Cut the vertical bars at a 45 degree angle, at a depth of only 0.5 cm on each side. Cut off excess wood as below.
 |
| Joint end for the vertical bars. One could keep the joint like this ( adjusting the horizontal joint accordingly) but cutting it as shown in the picture below, not only looks better but is a much stronger joint. |
 |
| Completed Vertical Bar Joint |
 |
| The obtrusion should have a slight dovetail angled cut for a stronger, tighter fit. (the gradient brown is the angled 45 degree cut) |
2. Cut the Horizontal Frame bars at a 45 degree angle, but this time all the way through. A groove will be carved in to the end joints for the vertical bar to fit in to.
 |
| Using a chisel slowly chip away bit by bit, as trying to chip off huge chucks is liable to split the wood |
 |
| Again the groove is shaped to accommodate the the slight dovetail cutting of the vertical frame joint. It should be a comfortable tight fit. |
 |
| Completed Joint for the horizontal bar |
3. Test out how each joint fits in to its corresponding partner (their in a monogamous relationship, no changing partners.. :)) and adjust, custom fitting them accordingly ( you can just use a rasp or sand paper to make slight fitting adjustments).
4. Make sure to lie both sides of the wood flush on the ground or a big flat table surface when doing this. This is so one can accurately test and adjust the frame fittings while ensuring the frame will be straight once assembled. Join all the joints together as a complete frame to make sure again the joints fits perfectly when the bars are angled at a perfect 90 degree angle, and that the whole frame lies flush to a flat surface.
5. Mark each joint so as to know which vertical joint belongs to which horizontal joint.
Now the joints are done, we can go on to carving out the grooves for the painting to fit into.
Part 3 : Carving the Grooves
It's an inevitable occurrence for a large piece of artwork on hardboard to warp in time if not properly braced. The thick textured media on this paintings surface, made this the most ideal method for bracing that I could think of.
 |
| First I used a very sharp pen knife for the outline (so the edges are neat) then chiseled out the groove as deeply as need be so that the artwork fit snugly in the indentation while also ensuring the frame joints fit perfectly into each other. |
1. Make a tracing of the artworks side contours. Then transfer the tracing to its corresponding side frame bar so you have an accurate outline to follow when carving.
2. You may find making the outline slightly bigger (just about 1/8in) will give a more comfortable fit (if it's too tight it may damage the sides of your artpiece). Just be sure the straight backing outlines are the same distance on all sides of the frame bars so that the hardboard gets the straight bracing intended.
 |
| The straight backing outline should be absolutely straight and be the same distance from the edge ( 0.3 Inches) on all sides. |
 |
| Shown is an example of how the frame bars are carved on their inner sides. Keep testing the fit and carve more if need be so that the frame fits the artwork and in to each others joints perfectly. |
 |
| The artwork is fitted in to the indented frame about 0.37 inches deep. |
 |
| Testing to see if the artwork fits perfectly in to the grooves while making sure the joints fit well together too. |
2. Be sure to check how all four sides fit together (with the artwork fitted inside) to make sure that all the joints fit tightly together (at right angles) while the whole frame lays flush on a flat surface. You may find a part of the indentation is not deep enough and is inhibiting all the joints from fitting well. Find the trouble spot and carve it deeper. While you want the frame to fit together properly try to keep the indentation snug enough so that the artwork doesn't wobble around.
 |
| Frame bar carved to fit around jutting out stone. |
Part 4 : Joining the Frame Together
Before sanding or applying a finish to the wood, the holes for the screws will be drilled and the fit tested again with the screws screwed in.
 |
| Piece of plywood cut in to an Isosceles Triangle. |
1. Cut 4 identical right angled plywood triangles for the corners of the frame. I wanted the artwork to be easily dismantled from the frame at any time so did not wish to glue the joints together as is often done for frames.
2.To help me hold the frame joints together tightly while I drilled the holes for the screws, the joints were stapled together with a staple gun.
3. Before drilling, make sure the corners are at a perfect 90 degree angle and that the frame is flush to the flat surface underneath. Place the triangle plywood flush with the frames edges.
4. Be sure not to drill the hole through the indentation on the inner side of the frame bar. I drilled my holes about 0.25 inches from the outside edge of the frame.
5. Drill the holes no more than 2/3 the woods thickness in depth.
6. Each triangle plywood piece will be screwed to the same corner it was drilled with, so be sure to discreetly mark them and their corresponding corner to keep track.
7. Before continuing, I did a final check, fitting the artwork in the frame and screwing it all together.
This helped in assessing whether the artwork had been accommodated for comfortably after all the pieces had been attached together tightly,... sometimes the fit was a bit tight and I had to make my grooves a bit deeper.
 |
| Final check of the fitting before going forward with finishing touches |
Woopse daisy I drilled a hole in the wrong place! what to do?
TRy NOt to let this happen ever.... but sometimes mistakes do happen. Thankfully this is one that can be fixed quite easily.
 |
| Mixing Saw dust with PVA Glue. |
1. Round up a bit of saw dust you've accumulated while working on this very frame and just mix with some PVA glue.
 |
| Plugging the hole. |
2. Roll in to a long plug and insert in to offending hole. Stuff as much PVA sawdust mix as the hole can take, making sure it's level with the surface. Leave to dry... You will be able to sand smooth once dry for additional finishing.
Part 5 : Finishing the Wood
I love the natural grain of wood and just wanted to enhance it and give some form of protection with Linseed Oil.
1. As I understand it Thickened Linseed Oil is the best linseed for finishing wood as it's faster drying and more durable.
2. After sanding apply the oil generously with a rag, as much as can be absorbed by the wood.
3. Now from what I've read one should wait for this application to dry after which one repeats the application several times (waiting for each to dry). However I didn't have enough time before the exhibition so decided to help accelerate drying time with a little Liquin (a little expensive but worth it) This suited me as I could get the finish I wanted in time and still be able to apply more linseed later after the exhibition if need be. I managed to apply about 3 applications, which really enhanced the wood grain and gave it a lovely golden glow. This tone darkens in time enhancing the glow even more.
 |
| Sanded and Oiled Wood resting on some paper, drying after applying the Linseed Oil |
I didn't think of this at the time but perhaps lining the grooves with soft fabric (wash well to remove any commercial treatments like sizing) for extra protection.
Part 6 : Copper Corners (extra bling!)
 |
| To help keep the corner joints fit tightly together two staples were gunned in to the front and back of the joint (instead of gluing which would be hard to dismantle). However that didn't really give the polish wanted for this frame... but no worries because next up is the best part!.. |
 |
| To give a more toned down, weathered look to the copper, I applied a thin mixture of Ultramarine and Burnt Sienna diluted with some turpentine on the copper before cutting in to Isosceles triangles. |
 |
| 12 Piece were needed altogether for all 3 frames |
 |
| It's easier to bend copper before hand, making it easier to fold over the corners of the frame later. Shown are two corners one for the left and one for the right side, mirror images of each other. |
 |
| The first staple, I tried to use as few staples as possible for easy dismantlement |
 |
| Altogether only 4 staples were used to attach a copper corner. One on top, another on the side and two on the bottom. |
 |
| Completed Copper Corner inscribed with my signature.. :) |
And thats it!... Case Closed!
Update!
 |
| Here's the piece completed and hung up at the gallery.. For a little more info on this piece please click here!.. |
Thanks for Visiting!...


Comments
Post a Comment